  |
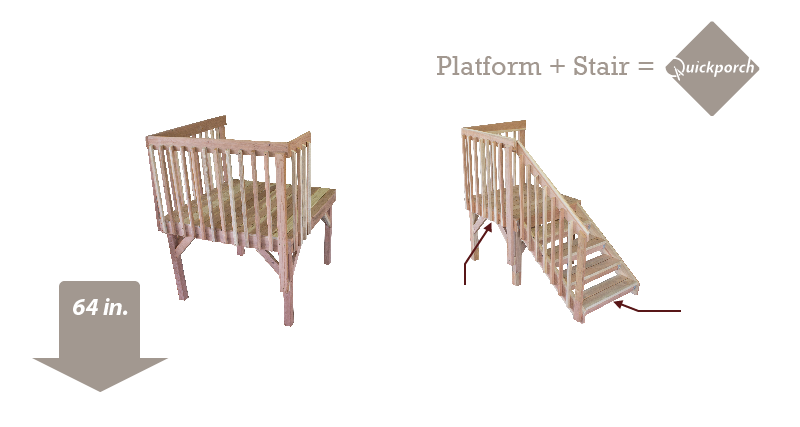
64 in. PlatformIntroduction to the 64 Kit
Tools needed: Parts included in 64 in. platform (64 packaged kit also comes with a stair kit):
Quickporch is a unique deck system. At one time during the process, the perimeter will be suspended and assembled level with temporary supports. The order of assembly at times may not seem intuitive, but it will assure the best results. Read all instructions BEFORE starting the project. Orientation to HomeClear all obstacles from the area where you intend to put the deck. Place the four perimeter pieces on the ground where you want the deck to sit. Determine which of the six configurations will work best for your installation. Configurations #1 and #6 will require only one handrail on the stair while configurations #2, #3, #4 and #5 will require a second handrail kit, which can be purchased separately. Configurations #3 and #4 will also require that the deck frame be turned 90 degrees from standard as shown in the illustrations. No Direct Ground ContactIf the posts are on grass or dirt, then dig into place some sort of block directly below the corners of the deck. (Tamp the holes with tamping bar or post to pack the dirt before placing block.) Check your local building codes to determine what type of blocks may be used. Here are some possibilities: concrete blocks, treated wood blocks, “bell” or precast blocks or poured cement with metal post bases. Following the assembly procedure below will make it easy to get the blocks exactly where you need them. Measure and MarkYour deck, after it is built, will be 64” x 64”. Use a tape measure to mark the house where the deck will begin and end, from side to side. Also mark the desired height of the deck at both ends or mark one end and use a level to determine the other mark. This height may be from ½” to 7¾” below the door depending on the door swing, local building codes and your preferences. When you have these marks, measure to the hard surface below and subtract 1” (the thickness of the decking) to get the length of your back posts. You can cut these posts now, but keep track of where each of them goes if they are different lengths. Build Your PerimeterLay out your perimeter on the ground and screw the corners together with 3 in. screws. The corners will overlap as in Illustration A. Each part will have an “X” marked on one end. That end must be toward the next piece of wood concealing it from view after the corners are screwed together. This will ensure that the punch marks on the outside of the perimeter are where they need to be to space your balusters correctly later. 
Next elevate the side of the frame that will be toward the house. NOTE: Remember configurations 3 and 4 require the frame to be turned 90 degrees. Install the two back posts in their appropriate corners, using 4 in. construction screws. This procedure is necessary to make it easy to install the construction screws on the back of the deck. Arrange the frame with the back to the house and align with your marks. Your frame will be about ¾” below the marks because you haven't installed your decking yet. Temporarily support the front of the deck. (A 2x2 with a screw in it or a stack of blocks will work as temporary support). Make sure the frame is level in both directions and square; measure from corner to corner to get it square. You can now measure, cut, and install the posts on the front corners of your deck. As before, make sure you are measuring to a hard surface, not to the dirt. Install using 4 in. construction screws. BracesThere is a pair of 2x4 braces for each corner post (a “right” and a “left”). Lay each set out ahead of time to get the more attractive braces to the front. Use four 2-1/2 in. screws on each brace. Place each brace flush with the outside of the post and inside the rim. Center JoistsOnce your posts and braces are installed and everything is square, you can remove your temporary supports and install the center joists. Set each 2x4 center joist in the ‘U’ brackets of the side rims. Be sure to “crown” each joist. (Crowning means that the high side of the joist is up when looking at it from end to end.) DeckingYou have been provided decking that is pre-cut for your deck. One narrow piece is notched on both ends to allow for mounting the stair and is to be used on that side. Start with the notched piece - letting it overhang 1/4 in. Put all of the boards on the frame, nice side facing up. Space the boards evenly across the deck leaving about 1/8 in. between pieces. (A simple spacing device is a 10d or 16d nail.) Make sure the last piece ends up flush with the back of the deck. Secure with the screws provided. Using seven screws per board, attach two screws on each end and one on each center joist alternating from side to side on screw placement. RailingYou have been supplied 40-1/2 in. balusters to go from the side of the perimeter to the 2x6 top rails. Both the top rails and sides of the platform have been marked with small holes (punch marks) to space your baluster for you. Put a 2-1/2 in. screw through the bottom holes of your 2x2 balusters and then into the punch marks on the perimeter of the deck. Leave the structural balusters until last the configuration drawing shows you the position of the 2x4 balusters. Do the same with the 2x6 top rail, and your railing will take shape quickly. Be careful to start the top rails 1-1/2 in. out from the house. Use 3 in. screws to attach the top rail corner. NOTE: Any top rail that runs out perpendicular from the house must be spaced out 1-1/2 in. This will allow room for siding or window trim and will make the corners overlap in the direction you need. Also, there will be an “X” on one end of the top rail pieces. That “X” will be toward the house or toward another board on a corner. The "X" should never be visible. It is necessary that these boards are placed correctly to make the punch marks line up vertically with those on the perimeter. After installing all of the small balusters with 2-1/2 in. screws, check with your level to see that they are straight vertical. Screw the corners together and put in the middle screw on each baluster. Included in the kit are two structural balusters: one for the corner near the house flush to the end of the top rail; one for the corner near the stair. The structural balusters need to be aligned such that the sides are flush with the sides of the posts. On each structural baluster, there are two pre-drilled holes at the top, four holes in the middle and one hole at the bottom:
|
|
Quickporch • 5961 East 64th Avenue • Commerce City, Colorado 80022 • 303-287-9166 |